Justin Shield
coder, gamer, parent
So it’s that time of the year again. Hiring season. The company I work for is looking for a (full stack) senior software engineer. As Lead / Principle Developer I will be interviewing candidates hoping to get their foot in the door, most of which fail the 5 minute mark.
Before I continue I should define what I term a senior software engineer and why most candidates who apply don’t exactly match that description.
The top rated answer on Stack Exchange sums it up nicely: When you should call yourself a senior developer
However that’s not quite what I’m looking for in a senior developer either. That is however the foundation of a senior software developer, or the starting point.
Most people applying for senior positions are hoping to progress from mid level but lack an understanding of the requirements of the role or position. Alternatively they’re senior in age and experience, however have never progressed past the coding conventions of 20 years ago. God classes, copy and paste everything, and testing code in production.
Here’s what I’m looking for when I’m interviewing candidates, and why.
- S.O.L.I.D. understanding of software architecture & object oriented design.
Dealing with legacy software is almost always filled with technical debt, compromising code, poor architecture, dirty hacks, bad design, code smells the list goes on. This requires strategies to not only work effectively with legacy code but to identify what’s broken in the existing architecture , and design solutions to correct it. Continuing to slap mud into a big ball is not a solution a senior developer should make.
- Deep understanding of common design patterns.
When asked the question “what’s a design pattern that you know or have used” most candidates cite “singleton pattern”, and I shudder. Yes it has it’s place however it’s also considered an anti-pattern and can sometimes do more harm than good. Refactored code will often contain some of the common design patterns and could take some time to get your head around them if you’re unfamiliar. Let alone be expected to improve upon them. The primary goal of touching any legacy software is to leave it in a better state than when we started. I’m not going to list the design patterns that you’ll need, I’ve already written articles on this topic already.
- Clean Code, Architecture and D.D.D.
A follow-on from the first point, clean code and architecture is a requirement for writing maintainable and easily testable and understood code. Any software project should strive to keep their code base maintainable whilst reducing any pain points when needing to introduce change to the architecture or design. As as aside here I’d add passing knowledge of Domain Driven Design, the concepts of bounding contexts and having a domain is more of an implementation detail of how to keep a clean architecture but is one of the tools that I use to separate architectural concerns along with clean architecture.
- Deep understanding of & for Integration, Unit testing and Test Frameworks
I personally don’t follow the strict Kata that Bob Martin evangelizes, however I agree wholeheartedly before you create a pull request, you should have a Unit / Integration test that proves the code you’ve just requested to be merged. One of the biggest problems often with legacy software is a lack of unit or integration tests, requiring all developers to have unit and integration tests around their software is one way that I can slowly chip away at the lack of code coverage.
- Reasonable understanding of functional programming.
Preferring “pure” functions over writing procedures gives us an opportunity to lessen the chances of introducing defects into what is mostly and imperative code base. John Carmack the co-founder of id-software and lead programmer has this to say about the subject. Does that mean that my code bases read like F# or Haskell or some variant of Lisp? No.. but where appropriate you will see functions declared so as to minimize global state and unexpected side-effects.
- Understanding Async and Multi-threading
Most popular O.R.M. tools are not thread safe. Understanding thread safety and how this will affect the behavior of the software application and architecture is an important ability. This may be somewhat subjective, not all developers have experience working with Async or Multi-threading, however most will have some experience even if it’s via MVVM view models running code on the background threads to avoid locking the UI on WPF or Winforms apps. Performance matters, being able to write safe non-blocking performant code is often as important as knowing operational complexity of an algorithm or data structure, and how to debug and write tests for such code is just as important.
The lists above is far from comprehensive, these are the key items that I look for in assessing the suitability of a candidate for a senior software engineer role. For me a senior engineer should be capable of handling end to end software development. Developing appropriate solutions that fit in with the overall architecture goals of the applications. Write well maintained, clean, readable, easily understood, tested, testable code. Writing code that performs, is scalable and is able to pass on knowledge to mid level and junior developers.
I have close to 20 years of experience writing software, I have first hand experience of what happens when you DON’T do any of the above. Hard earned experience forces us to look for answers to problems of the past to improve ourselves, recognize our mistakes, and iterate towards better outcomes. The items I’ve listed above are key skills that I couldn’t live without, how about you?
The industry today is in such a better shape than it was 20 years ago, I look forward to seeing how the industry is going to evolve in the future.
Why you should keep your own technical blog
3 Aug 2019You should keep a copy of useful information on your own blog, and not just keep a link to the original. This advice may seem to violate netiquette or social norms, but there’s a good reason to do it. A blog or link to stackoverflow isn’t permanent, a personal blog or site can be taken down or moved and your information is lost. This goes double for rarely used or niche technical info and blogs.
I’ve had this happen to me at least twice in the last 2 years, bookmarked a useful blog with the intention to come back later and finish the project and … it’s gone. Google search for similar information comes up with nothing. The same goes for stackoverflow, the links are supposed to be unique to help people find information. However they do prune the data and links are not guaranteed to be always present, they can be deleted or removed. Blogs can be moved or the original author decides to stop paying for their website or whatever \_()_/
If you find something important, grab a copy of the original and store it somewhere. Do yourself and the world the favor, write your own version publish it online and reference the original author as it’s only the polite thing to do. At least then you’ll have a copy for as long as you need it.
Leading Developers and Getting Things Done!
In: Essays
9 Jun 2018I’ve been a Team Lead, put in charge of projects with developers several times in the past few years. I’ve found myself in the position again after accepting a recent promotion. A lot of developers try to avoid the promotion to team lead because it involves a lot soft skills that are difficult to obtain or learn on the job.
Most software development teams that I’ve been a part of were are structured in such a way as to optimize a developers time, so that they can concentrate on tasks that provide the most business value (coding). This provides less time learning the necessary soft skills in order to be an effective team lead.
This had me thinking, what makes a good Team lead?
What are the skills required of a Team Lead?
That’s quite subjective, and going to have a different answer for every company. I’ve personally found the following skills essential
Communication
Being able to communicate effectively with people in a timely fashion. For developers this means that you might need to explain something in deep technical detail or write and design a process flow diagram. At the same time communicate with upper management on the progress of the 5 projects that your team is currently working on and provide estimations and projections on completion dates.
Sometimes this may also require you to “manage up”. This might be a polite email prompt to a stakeholder or client that you’re waiting for sign off on a particular design decision. Or a friendly reminder to your boss that something needs their input, they’re often busy and sometimes a little reminder is required. It’s best not to wait for manager to chase you to inquire about the status of projects your team are working on.
Project Management
SCRUM and Agile are great tools in order to help provide transparency to the business, and in my opinion is one of the core skill of a team lead.
One of the most important features of Agile that most companies overlook is that you should only have 1 backlog, and that backlog should be groomed in such a way as to prioritize the features that provide the most business value at any given time.
Having a separate backlog per project simply doesn’t work, what will happen is that you will get 1 or 2 developers dedicated to a project and you attempt to work on projects in parallel with dedicated resources. So you could be wasting time working on low value project work when they should really drop that $5 widget spinner and work on finishing that 500K feature for your most valued client.
1 backlog, 1 Team, 1 list of items that always provides the most business value at any given point in time.
Have a sprint planning wall.
It seems redundant at first blush but I personally find it hard to see large numbers of items in Jira. Walls don’t have that limitation, and also have added convenience of being able to be glanced and consulted by passing stakeholders and development managers who may not be familiar with Jira, but they can consult a wall. Developers can consult the board during daily standups and move sticky notes when they’ve completed a task.
It’s also convenient for reporting and tracking the status of multiple projects/features at the same time at a single glance. It’s not a replacement for Jira, but an additional tool to help visual and manage multiple projects.
Technical Leadership
Developers may look to you for guidance for architecture and design, coding practices, security standards, code reviews. Being able to provide deep technical knowledge and experience when dealing with developers and provide suggestions or examples lead them towards answers and enable them to do their job. And this is key, leadership is not micromanagement. It’s providing direction and giving developers the tools to find the best way to do their jobs themselves.
Managing developers
Managing a team of highly creative people is quite often likened to “herding cats”, difficult to almost impossible. Command and control management doesn’t work with creative people, it stifles their creativity and ability to perform.
So what does work?
- Trust your team knows their job – get out of the way and let them do it. Don’t micromanage and don’t dictate how something should be done. You may not be the smartest person in the room.
- Provide an environment of psychological safety – Instead of pointing fingers and blaming Joe for introducing a bug. Or asking, why did you do it way X instead of way Y. Accept that the failure was a team effort and address the process failure, people are only human.
- Know your people – know who have personality clashes on your team. Know who are subject experts, and allow them to contribute and play to their strengths
- Avoid knowledge silos – get other team members to review each others code, and move them around in tasks to spread domain knowledge around the team
- Avoid distractions – Absorb and deflect items that could distract your team. Constant distractions and context switching kills project velocity
- Give them tools – Ensure that your developers have the tools and resources to do their job. Latest versions of Visual Studio, Resharper, DotPeek, DotTrace.
- Provide a fun work environment. – Coming to work to a dull lifeless environment can kill anyone’s motivation to perform.
- Reward them for a Job Well Done – This is often well overlooked and taking the team out to lunch for completing a major project is always a winner
Getting things Done
I think this is a no-brainer, using David Allens method of Getting Things Done or GTD is essential for managing projects, people, anything with multiple moving parts.
GTD Website
Let me know if you think I’m missing anything.
Optimizing Long Running Processes with EF6 – Postmortem
In: C#
4 Feb 2018One of the issues my workplace has been dealing with over the past several months has been intermittent slow performance of long running processes.
In several cases it was impacting the entire company until the long running process had completed, it was doing pessimistic locking on reading data, causing deadlocks, and running really really slow.
Other team members were responsible for investigating and addressing the issues.
I disagreed with how they were going about it.
TLDR;
Skip to the end if you don’t want to read the whole story.
Backstory
Our team had just finished a 4 month project to replace store procedures with entity framework 6 (EF6).
In order to investigate the issues, team members involved decided that running SQL Profiler on the production server while the slowdowns were happening would identify a smoking gun.
It’s obviously a database issue, and fixing the offending execution plan(s) will fix the issues, right? Well… no.
It found 1-2 issues and brought down the time for 1 of the long running processes down from hours to just under an hour, but ignored the underlying problem.
Long running processes were taking 10x longer to run, compared to previously using stored procedures.
So this happens several times, each time the business is getting more and more frustrated with the lack of resolution of this issue.
And so this is where I get handed the problem with an open time frame to investigate and fix all long running processes on the system.
My Investigation
Running SQL Profiler in production when the issue is happening IMO is the wrong way to investigate this issue, it’s ignoring the gorilla in the room.
The EF6 project needed to be investigated and profiled. I wrote a lightweight tracer that logged method execution times to a file, and wrapped every method that interacted to the database and got to work.
What did I find?
I didn’t find 1 smoking gun, I found heaps of little smoking guns, adding up to a small platoon.
- Un-optimized EF Queries
- Fetching large amounts of unnecessary data from the db (poor fetching strategies)
- Read Queries with change tracking over large sets
- Bulk inserts with change tracking over n entity inserts
- Pessimistic Locking
- Sequential Processing over mutually exclusive aggregate roots
Optimizing EF Queries
First order of business is to fix the offending EF Queries.
There’s lots of great information on the net about fixing these issues.
Personally I went through the list here provided on
Reduce unnecessary retrieved data
By returning only the data that we’re going to use will reduce the overhead of each query.
E.g. If we only want the list of pupil names of a school, it’s not necessary to retrieve the entire school.
Transform queries from this
Listschools = db.Schools .Where(s => s.City == city) .Include(x => x.Pupils) .ToList();
To this
var pupils = db.Pupils
  .Where(p => p.SchoolId == schoolId)
  .Select(x =>  new { x.FirstName, x.LastName })
  .ToList();
Optimize read-only queries
If you don’t need change tracking (i.e. to perform writes), add .AsNoTracking() to your query to ensure it will not be loaded into the context
Listentities; using (var context = new DBContext()) entities = context.YourEntity .AsNoTracking() .Where(x => x.Name == "Example") .ToList(); // ... some operation on entities that does not require a save
Speed up Bulk Adds
If you are simply adding a number of objects then saving them, EF will check whether each of those new objects has changed. To avoid this, turn off AutoDetectChangesEnabled before adding, then back on again afterwards.
using (var context = new EFContext()) {
    context.Configuration.AutoDetectChangesEnabled = false;
    try {
        // Perform adds
        context.SaveChanges();
    }
    finally {
        context.Configuration.AutoDetectChangesEnabled = true;
    }
}
I like adding the finally clause so that even if there is a problem with SaveChanges() or the adds we will reset the AutoDetect Changes for any other operations used in this context.
Pessimistic Locking
By default, out of the box if you don’t configure SQL Server it will come with Read Committed Transaction Isolation (RCTI) at the Database Level, or Pessimistic Locking.
What RCTI essentially does is creates shared locks whenever a transaction tries to read data and blocks all other read transactions from reading that row.
Now you can imagine if you had some common query that cycled over all members of an account, if any other query lets say a long running process fetched and performed actions on those members. It could cause some significant slowdowns while waiting for locks to clear for both read and write operations.
Switching to Optimistic Locking for Reads (Read Committed Snapshot Transaction Isolation)
Read Committed Snapshot Transaction Isolation or RCSTI works a little differently. While reading it doesn’t take out a shared lock but instead relies on row versioning for its writes.
Anytime RCSTI writes data to a row, it will version the row and provide the previous version to read operations during its write operation. It will create shared locks for concurrent writes, however reads are extremely fast as there’s no locking overhead and it’s not waiting on a shared lock to clear so more than 1 transaction can read the same data at a time.
RCSTI isn’t a holy grail, it comes with it’s own issues that need to be considered.
I recommend going through this guide before implementing RCSTI for yourself. I’ve gone for a hybrid approach myself, and only enabling RCSTI on selective queries after I’ve reviewed the performance and side effects of possible out of date reads.
implementing-snapshot-or-read-committed-snapshot-isolation-in-sql-server-a-guide
Sequential Processing
With all of the above issues addressed, this is by far the easiest one to address last. With the Task Parallel Library introduced to C# this has now become trivial.
The entities that were being processed in sequence were all mutually exclusive aggregate roots. This means that they were perfect candidates for multi-threading or processing in parallel. With only a single connection to the database to perform multiple reads collate data, perform calculations and then write back out to the database on conclusion, neither the database nor the processor were being taxed in any way. The time taken was essentially overhead for setting up and performing data transformations.
The End Result
The end result from all of the optimization?
For the same processing batch
- Stored Procedures averaged 20 mins
- Un-optimized EF6 averaged between 50-70+ mins (bad mkay?)
- Optimized EF6 averaged 22 mins (EF overhead)
- Optimized EF6 with TPL < 4 mins
The stored procedure was performing the entire processing inside itself as a long running procedure and so didn’t lend itself to parallel processing. Along with other issues inherent with having any business logic hidden away in a database level structure.
With converting to EF6, optimizing and then performing mutually exclusive tasks in parallel.
I’ve not only addressed the EF6 issue, but improved the performance throughput over the original stored procedure.
Next step – micro services processing
Postmortem
So if faced with the same issue again, I’d perform these steps to fix.
- Put tracing around all functions or methods that access the database
- Optimize EF Queries
- Review Fetching Strategies
- Remove Change Tracking for Read Queries that don’t need it
- Remove Change Tracking for Bulk inserts
- Replace with Read Committed Snapshot Transaction Isolation where appropriate
- Parallel Processing over mutually exclusive aggregate roots
Simply investigating the database in isolation is only looking at part of the whole picture with your eyes closed, in the dark, in the basement.
It smells down there, could be GRU’s.
- No Comments
- Tags: EF6, Optimization
Free SSL Certificates from LetsEncrypt
In: Security
26 Aug 2017Seems to good to be true?
Well maybe not.
Not if you consider who is giving away the Free Certificates.
Lets Encrypt is a SSL Certificate Authority run by the EFF. If you’re not familiar with the EFF or the Electronic Frontier Foundation. They are a non profit organization defending digital civil liberties. The EFF are promoting Lets Encrypt in order to get everyday people, blog owners and the like to encrypt everything they do online and promote security awareness around our digital lives.
The largest obstacle in their eyes is the cost of owning an SSL Certificate and the cost of managing said Certificate(s). Just looking locally here in Australia, I can pay from anywhere upwards of $70 AUD per year, per site. So if you wanted to protect both your mail server and your web server that’s $140!
That $140 a year adds up just to protect your blog that you don’t update, so almost no-one does it… well now you have no excuse not to!
Lets Encrypt have a Digital Certificate Authority that automates creating, updating, and managing your digital certificates for FREE. All you have to do is prove that you own the domain and they will provide you with a digital certificate for that domain. Which is pretty much how most low end digital certificates get provided by most CAs anyway. For securing your blog, these certificates are more than adequate. You’ll need to read through the site and follow the instructions provided within for further details.
I highly recommend that you check out the link above and do the same.
Just a note, the Certificates they provide are only valid for 90 days, so if you don’t use a cron job or something similar with their automated tool to renew the certificates you will have to do this manually.
Happy secure browsing!
Teaching kids to code
25 Nov 2016Programming is probably one of the most important subjects that educators have identified as part of STEM that we need to encourage kids to get interested in at an early age. Almost everything in our daily lives is programmed in some fashion. Your car might have EFI (Electronic Fuel Injection) controlled by a computer, your washing machine might have a computer controlling cycles & timers to the smart card that you use during your daily commute.
Someone, somewhere programmed that device you’re using… right now. So the importance of programming is now beginning to dawn on people everywhere all over the globe as we get more integrated Internet of Things spamming us with whatever it is they’re doing – brewing coffee?
So how do we get kids into programming? Lets take a step back, how did I get into programming?
I can remember my first programming language that I learned to use as a kid.
BASIC written for the VTech PRECOMPUTER 1000.
Now I’m showing my age, this thing is now classed as VINTAGE! Way to make me feel old.
It was HORRIBLE! It had a book with 3 or 4 BASIC word games such as Hang Man, Hello World, etc. You had to type each line painstakingly line by line following the instructions in the book. If you made a typo you would spend up to an hour looking for it. I can’t imagine how many kids of 13 would simply give up and consider it “too hard” or “too labor intensive” and instead go and play Sega.
MIT had exactly the same thought when they designed SCRATCH
Take a minute to watch the video below, SCRATCH in a single word is AWESOME!
A simple programming language where you drag logic blocks to form programming statements to make games, animations, sounds or anything you like.
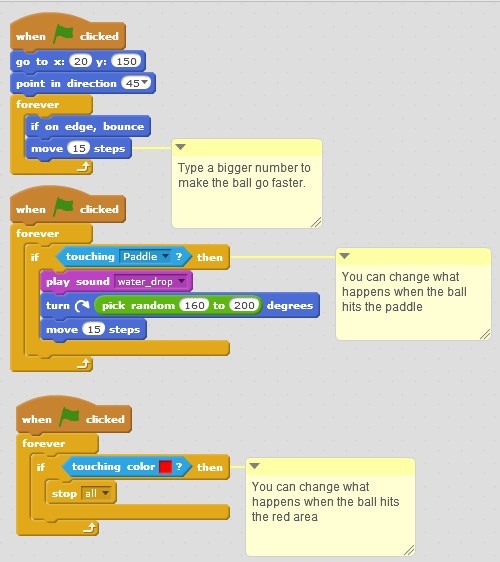
I’ve been a coder-dojo mentor for a couple of years now, it’s a fantastic way to spend a weekend teaching kids to code. If your child can read and can perform basic logic they can learn to code. One of the best ways by far in teaching kids how to code is to get them to do something they love doing, play games.
If they can play games and learn something at the same time they will be motivated and more involved in the outcome. It’s simple, easy to understand and best of all it runs in your browser. If you’re looking for a iPad or Android version, fret not there is ScratchJr
I’ve developed a few resources for the kids to take an existing working game and to modify it to make it their own.
Feel free to make remixes of these and see what your kids can do with them.
Resources:
Scratch Tutorials – http://kata.coderdojo.com/wiki/Scratch_Tutorials
Handout – ScratchGames
Pong – https://scratch.mit.edu/projects/11607748/
Helicopter – https://scratch.mit.edu/projects/11607952/
Space Invaders – https://scratch.mit.edu/projects/18797936/
DIY Virtual Reality – In your pocket
2 Oct 2015It’s almost 2016 and virtual reality is almost a thing. While we’re all waiting for the production version of the Occulus Rift, we have a pretty suitable substitute sitting in our pockets right here right now. And the best part yet, we can already use this to play Occulus Rift Compatible VR Games, and it’s dirt cheap ($12 for Google Cardboard on ebay) and the Smartphone you already have. People are calling it the “Occulus Thrift”.

Things (and links) you’ll need:
- Smartphone
- Personal Computer
- Google Cardboard (Cost $12) / 3D Printed Cardboard Clone
- Virtual Reality Drivers – (Cost Free)
- Kino Console Streaming Software – (Cost Free)
- VR Compatible Game
- Free Pie – IMU Head Tracking – (Cost Free)
Smartphone

Choosing a smartphone for Virtual Reality consists primarily about pixel density. When viewing the phone though lenses you can get what’s called a “screen door” effect where you can see the individual pixels as if looking through your virtual world through a screen door. Using a high pixel density phone means far less noticeable screen door effect and higher resolution images.
Samsung have based their new Gear VR Headsets around the Samsung Galaxy S6 and S6 Edge smartphones, if you’re interested in getting a new phone, I recommend going for one of those as it both meets the computing and pixel density it’s also compatible with the Gear VR headset so you can upgrade your DIY VR Headset.
However any smartphone with a decent pixel density should work (android, windows or apple).
Left: Photo of my old S3 using my new S6. I saw plenty of pixels on this old beast, the new S6 is way better and easier on the eyes.
Personal Computer
To get the most out of your VR experience I recommend that you have a decent gaming rig. If you can play your favourite FPS games at a good framerate at a nice resolution this should translate to a nice VR experience. In addition to a PC you’re going to need decent a WiFi network in order to stream your desktop onto your phone.
Recommended Specs:
- NVIDIA GTX 970 / AMD 290 equivalent or greater
- Intel i5-4590 equivalent or greater
- 8GB+ RAM
- Windows 7 SP1 or newer
Additional Specs for Occulus Rift:
- Compatible HDMI 1.3 video output
- 2x USB 3.0 ports
Getting Started
Once you’ve collected everything you need to start see Things you’ll need. For this tutorial we’ll start with Mirrors Edge as it’s a well known VR Supported game.

To start you’ll need to have installed the Vireio Perception drivers and follow the instructions located here. Run the Vireio Perception App. Select DIY Rift, No Tracking and [your monitor].
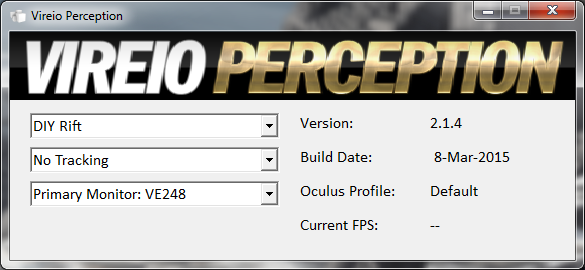
Note: that you’ll only need to run the DLL install utility of the Vireio App does not inject the VR drivers when running.

You should end up with something like the above. Which is great, however that doesn’t get it streaming to our Smartphone. Close down mirrors edge, now we know its working we can move onto the next step.
Streaming Games to your Mobile
Kino Console is a (free) awesome game streaming app for Android, iOS and Windows Phone. I’ve been using it for a while and it’s brilliant. Kino console is a remote desktop app which streams both video and sound to your phone or tablet of choice. This means that you can play Diablo III on you iPad in your living room being streamed over your WiFi with almost unnoticable lag, I do notice that the audio lags however playing VR Games I use my PC’s headset. I’m told the Pro version has better network code for better Lag free video streaming.
Here’s a demo streaming Bioshock Infinite to my now antiquated Nexus 7, the sound you’re hearing is streaming though the nexus. You can see that it has very acceptable lag, I wouldn’t go playing Battlefield 3 though it, but for playing most non network FPS it’s pretty acceptable.
To setup Kino Console, follow the setup instructions posted on their website for your smartphone of choice.
Head Tracking
To have a truly immersive VR experience you need to have some form of head tracking. I won’t get into all of the different types of head tracking, however I will go into detail about the one that I use which simply takes over the Mouse Movement using your Mobile Phones built in I.M.U. or Inertial Measurement Unit.
At the time of writing FreePIE is only compatible with Windows PC’s and Android Phones. Download and install the Program from the website. The application will have an .exe and also an .apk to install on your Android device. Note you will need to allow “Out of Market” apps to be installed in order to run FreeIMU on your device.
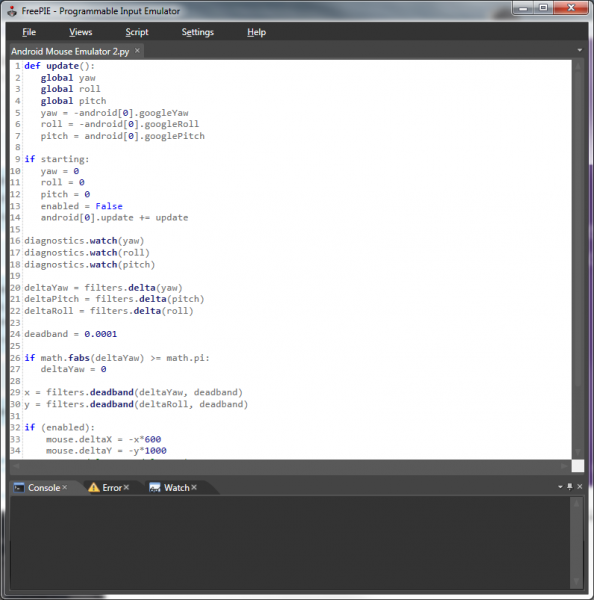
Python Code to Enable Mouse Tracking
1 2 3 4 5 6 7 8 9 10 11 12 13 14 15 16 17 18 19 20 21 22 23 24 25 26 27 28 29 30 31 32 33 34 35 36 37 38 39 40 41 42 | def update(): global yaw global roll global pitch yaw = -android[0].googleYaw roll = -android[0].googleRoll pitch = android[0].googlePitch if starting: yaw = 0 roll = 0 pitch = 0 enabled = False android[0].update += update diagnostics.watch(yaw) diagnostics.watch(roll) diagnostics.watch(pitch) deltaYaw = filters.delta(yaw) deltaPitch = filters.delta(pitch) deltaRoll = filters.delta(roll) deadband = 0.0001 if math.fabs(deltaYaw) >= math.pi: deltaYaw = 0 x = filters.deadband(deltaYaw, deadband) y = filters.deadband(deltaRoll, deadband) if (enabled): mouse.deltaX = -x*600 mouse.deltaY = -y*1000 #mouse.deltaX = -deltaYaw*600 #mouse.deltaY = -deltaRoll*1000 toggle = keyboard.getPressed(Key.M) if toggle: enabled = not enabled |
You’ll want to copy the code above into Notepad or your favourite editor and save it somewhere. Open up your saved script inside FreePie, click Script Run Script from the Free PIE Menu above.
Open Free PIE on your Android Device and enter in the IP address of your PC.
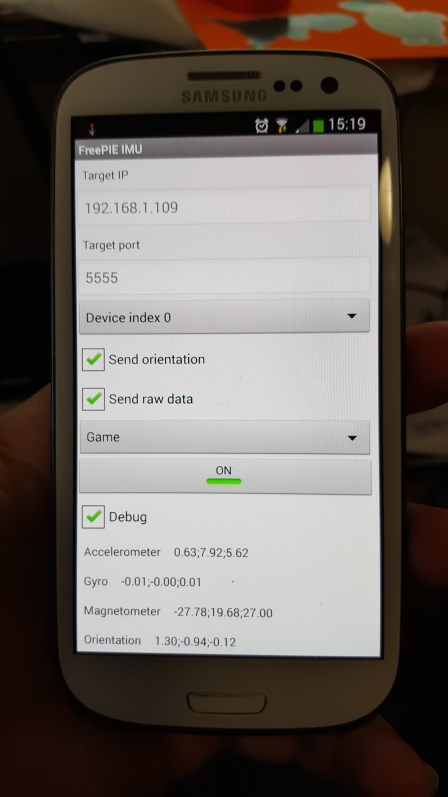
Click “ON”, now you’ll notice that nothings happening.
If you read the python script carefully at the end, it’s set so that by default it’s not active until you hit the “M” key on the keyboard. Pressing “M” now should show you the mouse moving around your screen according to your phones landscape mode orientation.
If you hit the home button on your android device, the IMU will continue running as a background process until you stop it and close the App.
Putting it all together
Putting it all together now requires the following process.
- Start up Free PIE
- Connect the Free PIE Android APP
- Ensure that both are running and collecting data (click the “watch” tab in the FreePIE Console).
- Open the Vireio Perception App (if you didn’t install the driver via the isntructions)
- Open the Kino Console Remote Desktop App and leave open
- Open Kino Console App on your Device
- Choose a game to play from the list
- Insert into your favourite VR Goggles and Enjoy
3D Printed Cardboard Clone with adjustable focal length (Work in progress), designed using Sketchup.


If you’re interested in printing a copy of these adjustable focal length VR Goggles for yourself, you can find the files on Thingiverse.
Now that the VR Headset is working via your WiFi you could use a wireless controller and play in a different room to your PC.
So far I’ve played Borderlands, Mirrors Edge using this method, I’m about to try Fallout 3 and New Vegas prior to Fallout 4 being released.
Let me know in the comments below if you’ve found this article helpful.
3D Printers: Buying Vs Building
In: 3D Printing
18 Sep 2015I’ve owned a 3D printer for about 2 years now, and I can say it’s one of the best nerd gifts that I’ve ever given myself. I’ve made dozens of things on it, some useful most of them not so useful, some of them downright fun. I chose to build my 3D printer from a Kit as opposed to buying a premade one.
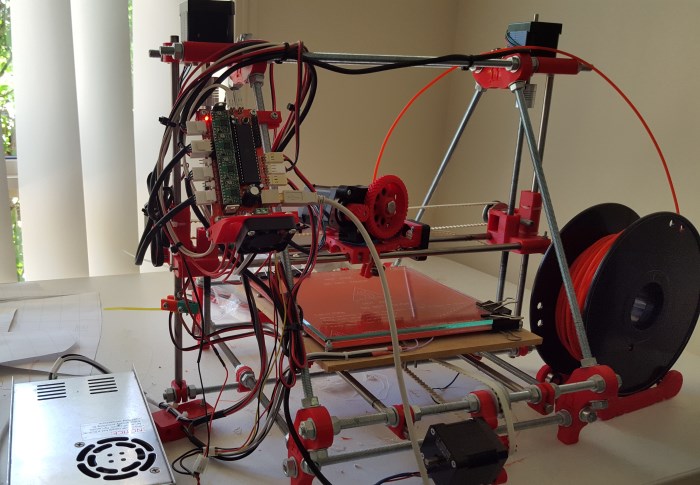
The primary reason that I chose to build vs buy were pretty clear 2 years ago, the cost and availability in Australia were prohibitively expensive to buy a commercial desktop 3D printer. Today however prices have come down to less than what I purchased my kit 2 years ago, so price is no longer the deciding factor.
Today the deciding factor for me has changed to:
Do you want to build, tinker, increase your knowledge / Do you just want to use it like an appliance?
There’s no right answer here really, it’s up to the individual on what they intend to get out of owning a 3D Printer.
Building
Pros:
- Cheaper than most professional grade desktop 3D printers
- If something breaks (and it will), you know how to fix it (after all you built it).
- Huge community of support and improvements for custom 3D printers
- Not locked into manufacturers filaments or Digital Rights Management
- Custom filaments – including wood grain, carbon fiber, translucent plastics
- Free open source software to Make, Slice and Control your printer
Cons:
- Calibration is extremely difficult, time consuming and error prone. (Big CON)
- Every time you change filament, you need to re-calibrate your extruder.
Buying
Pros:
- Calibrated from the factory (BIG PRO)
- Extruders are generally made from aluminium so can avoid melting
- Cases are generally very high quality and includes enclosures so you don’t breath in any fumes from the printing process (if you go ABS)
- In General based from newer iterations of the reprap printers which avoids harmonic resonance and so can print faster
Cons:
- More expensive than building or buying from a Kit
- Locked into the manufacturers software
- Locked into the manufacturers filament (can be more expensive than custom filament)
My Recommendation
If I were to do it over again today, I would probably still build (an i3 vs an i2 model Reprap Prusa), however to my friends and people I meet who are not hackers and tinkerers I highly recommend buying a desktop 3D printer. For similar price to buying a kit, you get a well tuned, calibrated desktop printer where you can plug it in and get reliable high quality prints day after day.
Just be aware that different commercial printers can have a small build volume. Price & build volume should be key indicators for choosing your next desktop printer.
Building from a Kit
Mendel Prusa i1.5 kit by Emblem Robotics ($550)
Maximum build volume: 20 x 20 x 12cm (good build volume)
Software: Free open source software available
Commercial Desktop 3D Printers
Davinci 1.0 by XYZ Printing ($500)
Maximum build volume: 20 x 20 x 20 (good build volume).
Software: Supplied
Up Mini ($899)
Maximum build volume: 12 x 12 x 12cm
Software: Purchased separately
FlashForge Creator Pro ($1535)
Maximum build volume: 22.5 x 14.5 x 15.0cm (good build volume).
Software: Purchased separately
Makerbot Replicator 5th Gen ($5100)

Maximum build volume: 25.2 x 19.9 x 15cm
Software: Free Supplied by Manufacturer
You might be thinking, wow the Makerbot Replicator is so much more expensive than the rest. Makerbot is one of the original companies behind the desktop 3D printer industries we have today with their cupcake CNC (no longer available). Their software and printers are one of the best in the industry with years of improvements behind them. If you want a reliable printer with huge support and high quality filaments, wifi management, etc then the $5100 price tag is understandable.
For beginners who are looking for a Sub $1000 desktop 3D printer, I highly recommend the Davinci for $500. It’s got good quality prints and a great build volume for printing out large parts for your next project.
However if you’re a hacker, tinkerer or builder, I highly recommend that you build one from a kit or source the parts yourself. The experience that you get by interfacing all of the different components and building will make you a better builder with a more in-depth understanding of mechanical engineering, physics behind fused filament extrusion and many more things. I’ll be expanding on what I’ve learned in future posts. So keep your eyes peeled for more information.
- No Comments
- Tags: 3D Printer, Review

Developing a mobile application these days is an arduous task. You need to have a mobile app to get your business noticed and to gain market share with your audience, however which platform do you choose? Apple? Android? Windows Phone?
Cost of developing a mobile app is one of the biggest hurdles besides the choice of platform. To get an application developed natively in two of the three major mobile operating systems immediately doubles the cost of development.
Each mobile operating system is designed around development in a specific programming language and development environment.
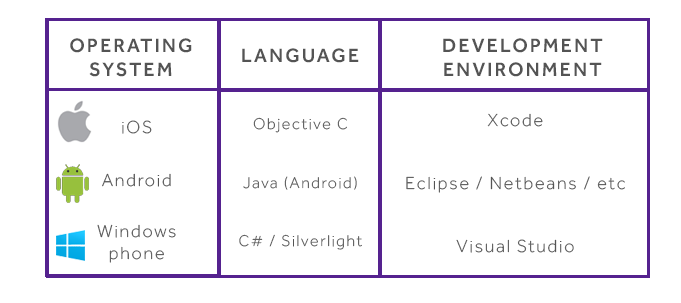
3 different operating systems, 3 separate languages and development environments, and counting. To be able to cater to all of these operating systems natively, mobile app developers need to have someone able to be an expert in each of these programming languages and also be an expert in the nuances of how each mobile operating system works. Task lifecycles, multi-threading, memory limitations, garbage collection, etc.
Thus to have 1 app developed in its native language and environment will take 3 times as long. Thus tripling the cost of development.
Cost of Maintenance
Any code written for any one of these is incompatible with the other and needs to be completely rewritten in the native language and development environment so that it’ll work for the target platform.
Because of that there will be subtle differences in the code base for each platform, so any future modifications to the app will require 3 separate changes, one for each language and platform, thus also tripling the long term cost of maintenance.
There is a solution to this dilemma, it’s not a silver bullet, however for most applications cross platform development may be a viable alternative.
Cross Platform Development
One solution to bring costs down is cross-platform development. Until such time as everyone settles on a specific platform for all mobile phones and tablet devices this will continue to be a huge time and cost saver for people interested in getting a mobile app developed for multiple platforms.
There’s essentially 2 approaches that cross-platform framework developers have taken to solve this particular problem.
- Web app wrapped as a native app, such as Adobe PhoneGap/Cordova
- Cross platform tool that creates native apps, such as Xamarin Studio
Mature Frameworks
Both Xamarin and PhoneGap are fairly mature cross-platform development frameworks. Xamarin – Mono project has been worked on and actively developed against since 2001. PhoneGap is less mature than Mono being first developed in 2009, however the concepts behind HTML5 and JavaScript have been around much longer.
High Profile Xamarin Apps
High Profile PhoneGap Apps
http://phonegap.com/app/feature/
PhoneGap
The purpose of PhoneGap is to allow HTML-based web applications to be deployed and installed as native applications. PhoneGap web applications are wrapped in a native application shell, and can be installed via the native app stores for multiple platforms.
Hybrid App
PhoneGap is really a hybrid development platform, neither being truly native, nor purely web-based. All layout and rendering is done via the Web View.
PhoneGap strives to provide a common API set which is typically unavailable to web applications, such as basic camera access, device contacts, and sensors not already exposed in the browser.
To develop PhoneGap applications, developers will create HTML, CSS, and JavaScript files in a local directory, much like developing a static website. Extending the capabilities of PhoneGap is via the use of plugins for each supported platform. Plugins are written in each platforms native language and development environment.
If there isn’t a plugin that does what you’d like to do with your device already, you’ll need to revert back to writing native code for each supported platform. As of writing there are a huge number of open sourced plugins available from the phonegap.com website ranging from Near Field Communication to Instagram and Facebook integration.
https://build.phonegap.com/plugins
Advantages of PhoneGap
- Supports 7 Platforms (Apple, Android, Windows, Blackberry, Symbian, Bada, webOS)
- Single Standards compliant UI language (HTML5, CSS, Javascript)
- OpenSource (Extending and developing plugins or modifying is easy and accessible)
- Support Packages Available for Developers
- Developed by Nirobe (ex Novell developers and purchased and supported by Adobe).
- Free (Open Source)
Xamarin
Xamarin has brought to market its own IDE and snap-in for Visual Studio. The underlying premise of Mono is to create disparate mobile applications using C# while maintaining native UI development strategies.
Essentially this means that you’ll need to have a developer familiar with the User Interface for each platform, which is not ideal however the compromise that they’ve decided to go down has to do with Native look and feel and responsiveness.
Unlike PhoneGap, writing native UI does not have the same limitations placed on it that Web Applications do for real time performance and UI updates. Xamarin studio has abstracted tools for creating the Native UI for each of the target platforms so developers do not need to buy or open separate IDE’s
Xamarin Architecture
In addition to creating a visual design platform to develop native applications, they have integrated testing suites, incorporated native library support and a Nuget style component store. Recently they provided iOS visual design through their IDE freeing the developer from requiring to open XCode.
Xamarin has provided a rich Android visual design experience based from work done previously by the eclipse project. The major advantage and what is truly amazing is the ability to use LINQ to work with collections as well as create custom delegates and events that free developers from objective-C and Java limitations.
Many libraries (not all) work perfectly in all three environments.
There are several advantages of using Xamarin including
- Near native performance
- 100% platform API coverage
- C# goodness – LINQ, async\await, TPL
- Code reuse (average 75% code sharing)
- Testability
- Shared code between client and server
- Support
- Scan your code for conformance scan.xamarin.com
Comparison – Xamarin vs PhoneGap vs Native
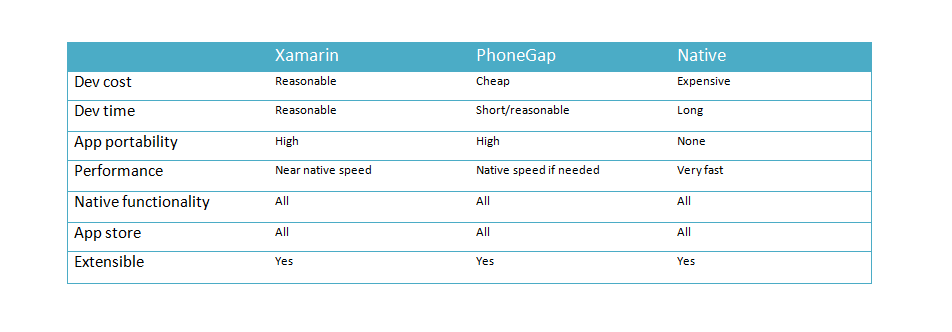
Looking at the above table it’s fairly clear that the winner is cross-platform development when compared to native development. However what’s less clear is the distinction between Xamarin and PhoneGap.
Being able to choose between these two platforms will depend on the particular application that is being developed.
Reasons to choose PhoneGap over Xamarin
- Application lends itself natively to being a web-app (Reduce UI cost)
- Cheaper to develop UI per platform
- Plugins already available for needed features or plugin development is minimal
Reasons to choose Xamarin over PhoneGap
- Legacy C# application code (code sharing)
- Requires Native Performance for the UI
- No need for plugin development for On Device Processing
- Cross UI development with MVVM cross (allows for common UI code to be shared)
That’s not really a large list, I’ve used both of these products and in my humble opinion, these two products are very comparable. Xamarin lends itself more towards cross platform development between C# applications and shared code for projects. Whereas PhoneGap lends itself to be more suitable for “web apps” on mobile with some device capabilities (camera, sms, phone, etc).
No Clear Winner for Small Projects – Xamarin vs PhoneGap
There’s no clear winner in capability between PhoneGap and Xamarin (each of them are both extensible) and each development platform has its advantages and disadvantages for a specific App (cost of development being the most pertinent). Each platform will need to be evaluated over the lifetime of the App to determine which version will provide the best cost savings for development going forwards. This is especially true for small projects or projects that little business logic outside of what is available to PhoneGaps’ existing Plugin Library, then these two frameworks fight on equal footing. However…
Xamarin – The Clear winner for Larger / More Complex Projects
I will say for larger projects Xamarin has a clear advantage over PhoneGap. Harnessing the power of C# and wrapping all native iOS and Android Libraries gives Xamarin ability to scale horizontally (in team size) due to a common language being used, and Vertically by harnessing Strong Typing means that over the course of your project lifetime developers can quickly and easily make changes and improvements to your application. Additionally there are a multitude of pre-existing libraries which are available to help boot-strap any project which with a little work can be refactored to use the PCL core libraries required to get these working under Mono.Android / Mono.Touch.
References
http://www.eastbanctech.com/10-reasons-for-choosing-xamarin-cross-platform-mobile-development/
http://www.theregister.co.uk/Print/2013/02/25/cross_platform_abstraction/
http://blog.mercdev.com/cross-platform-frameworks/
http://www.eastbanctech.com/10-reasons-for-choosing-xamarin-cross-platform-mobile-development/
- (3) Comments
- Tags: C#, Cross Platform, PhoneGap, Xamarin
This tutorial is going to assume that you already have the latest version of Umbraco CMS setup and installed. If not feel free to download and setup the latest version from umbraco.com/download, and the best part is that it’s free and open source.
If you’re unfamiliar with Umbraco CMS and are following along with this tutorial for the first time you can you read their easy-to-follow installation instructions directly from their website.
As part of this tutorial I’ve downloaded and setup a new blog using the blog umbraco skins package, feel free to setup and install any one of these for your first site. I’m going to modify this slightly for my default domain later on.

To demonstrate a multi-site configuration with umbraco, I’m going to use the following website domains on my local machine.
- blog.mammothmedia.com.au
- business.mammothmedia.com.au
I’m not going to go into details on how to do this since there are plenty of instructions available on the web. You’ll also need to setup IIS to point the new domains to your Umbraco installation, note that this is to the SAME umbraco installation. Umbraco can handle multiple hostnames, we’re going to show you how.
Create some templates
The first item on the agenda is to create some alternative templates so we can tell the difference between our two sites.
I’ve created some new templates called Business, and renamed the default templates to Blog. This way I can tell the two apart when I setup the content later.

Add new allowed templates to the current document types
Since I’m going to be re-using the same document types for my 2 examples, we’ll need to add the new templates to the allowed structure of the existing document types.

I prefixed my new templates with Business in front so I can tell which ones are going to use the business template.
Create some content
We’re going to separate our content in the Content tree by domain name.

If we right click on the new root domain folder and select “Culture and Hostnames” from the menu

From there we add the associated domain name to the content and we’re done from the Umbraco side.

You’ll have to do this explicitly for each domain.
Set the template for your documents
Business is going to be using the non-default templates which also uses a different style sheet. So I’ll need to set the template in the documents properties.

Make sure that you do the same for any document which has a different template.
Also don’t forget to save.
Test it out
The final step is to test it out. If I point my browser to blog.mammothmedia.com.au and I get the following website.
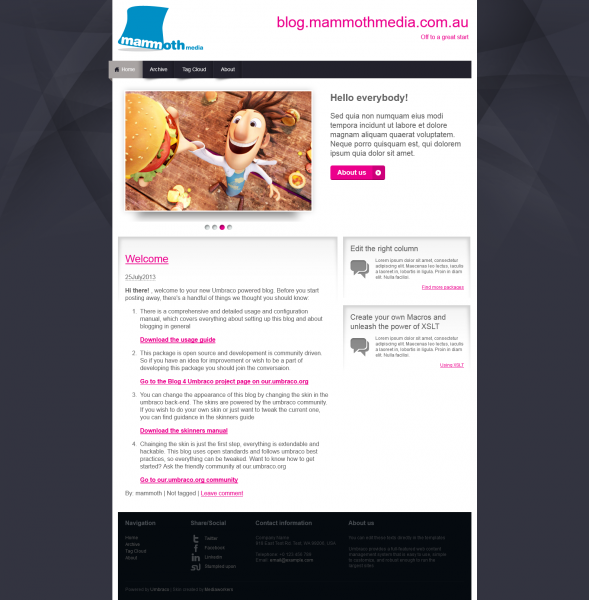
And for business.mammothmedia.com.au
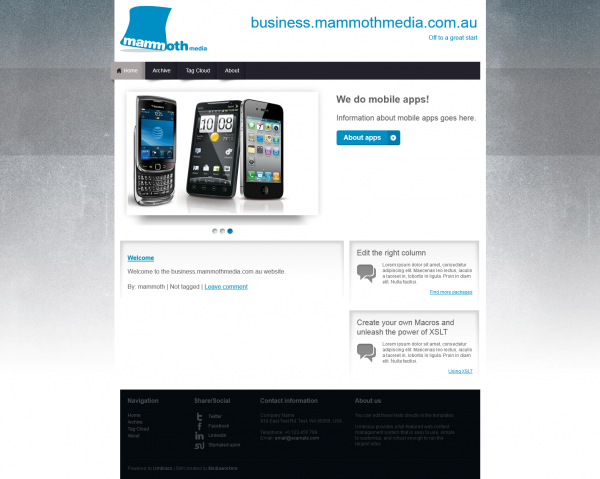
There you have it
Multi-site support with umbraco by example.
- (6) Comments
- Tags: HowTo, Umbraco
About Justin

Justin is a Senior Software Engineer living in Brisbane. A Polyglot Developer proficient in multiple programming languages including [C#, C/C++, Java, Android, Ruby..]. He's currently taking an active interest in Teaching Kids to Code, Functional Programming, Robotics, 3D Printers, RC Quad-Copters and Augmented Reality.
About This Blog
Software Engineering is an art form, a tricky art form that takes as much raw talent as it does technical know how. I'll be posting articles on professional tips and tricks, dos and donts, and tutorials.
Photostream
Categories
- 3D Printing (2)
- Automated Deployment (1)
- Blogging (2)
- C# (10)
- CMS (1)
- Conference (1)
- DIY (2)
- Education (1)
- Essays (4)
- Functional Programming (6)
- Haskell (4)
- IIS (1)
- Inversion Of Control (1)
- Javascript (1)
- Kids (1)
- Mobile (2)
- Mono (2)
- NAnt (2)
- Reflection (1)
- Security (1)
- Ubuntu (2)
- Umbraco (1)
- Unit Testing (1)
- Virtual Reality (1)
- Windows Phone 7 (1)
- What I look for in a senior software engineer Justin Shield: […] I’m not going to list the design patterns that you’ll need, I’ve already [...]
- Justin: Hi Ross, I do actually like Umbraco, it provides some nice abilities for creating websites that I [...]
- Justin: Hi GordonBGood, Thanks for taking the time in replying. You're absolutely correct, it is turners s [...]
- Ross Gallagher: Hi Justin, I'm a fellow Aussi looking to use Umbraco to create a simple website. I have downloaded [...]
- GordonBGood: This is the "Turner Sieve" which **IS NOT** the Sieve of Eratosthenes (SoE) neither by algorithm nor [...]
- What I look for in a senior software engineer
- Why you should keep your own technical blog
- Leading Developers and Getting Things Done!
- Optimizing Long Running Processes with EF6 – Postmortem
- Free SSL Certificates from LetsEncrypt
- Teaching kids to code
- DIY Virtual Reality – In your pocket
- 3D Printers: Buying Vs Building
- Cross-Platform Mobile Development: PhoneGap vs Xamarin
- HOWTO: Using Umbraco CMS for multi-site solutions
